
Are you ready to do this?
Today is the day you start your blog!
Something that scares off a lot of new bloggers is the tech side of things, but I’m going to be here with you every step of the way!
First, we are going to talk about which platform is best if you want to run a profitable blog, then I will show you how to set up your web hosting and then together we will install WordPress.
Let’s get started!
CHOOSE A BLOGGING PLATFORM
I recommend starting with WordPress. You will have more opportunities to customize your site, and it opens up all of your options when you want to monetize your site.
With WordPress.org you will need to have “hosting.” This is access to the server that will run your blog.
Think of it like this, your blog is your apartment, your domain name is your address and the hosting is your landlord. Fortunately, hosting is inexpensive.
There are other alternatives, like Squarespace, Wix, Weebly, and more – but I’ve either personally had blogs on those platforms or managed client accounts on those sites and trust me, WordPress is where you want to be.
These other sites have less opportunity for customization and generally are much more expensive (more like $200+ per year).
SET UP YOUR BLOG
I have worked in the blogging industry for over six years, and the best host I have found by far is SiteGround.In this tutorial, I am going to walk you through how to set up your blog, so you can start sharing with the world!
I RECOMMEND YOU START WITH SITEGROUND
Why?
1. Their Uptime Is Incredible.
One of the worst things that can happen as a blogger is to have your blog go down. Other hosting companies have frequent outages, but SiteGround has 99.9% uptime, which is pretty dang incredible.

How To Start A Blog With SiteGround
2. Their Customer Service Is Fabulous
No more waiting to chat with a representative for an hour. “Ain’t nobody got time for that!” SiteGround’s tech support is lightning quick and super helpful. They can help you setup your hosting for WordPress in under 10 minutes.Their service is available 24/7 and you can talk with tech support via phone or in an online chat (I always opt for the chat so I don’t have to worry about my little boy being loud in the background ).

How To Start A Blog With SiteGround
HOSTING & WORDPRESS INSTALLATION TUTORIAL
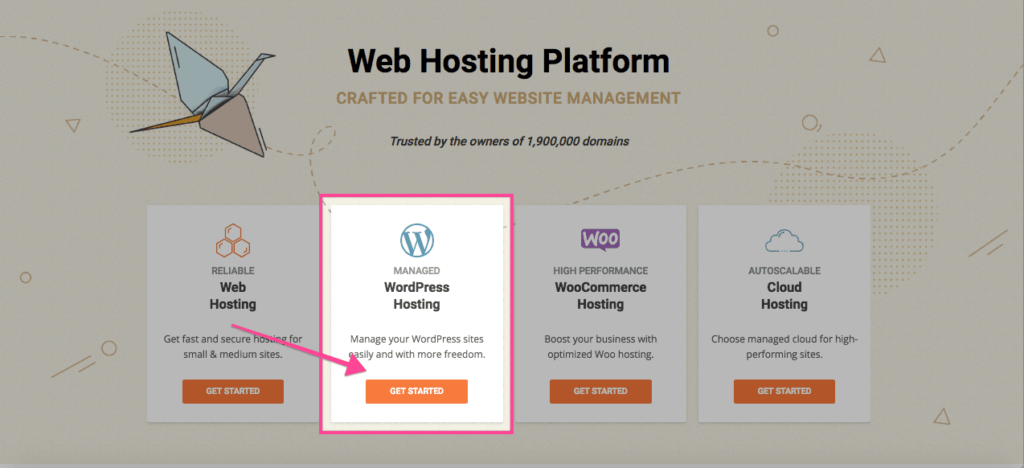
First, click here to visit SiteGround.com so you can follow along with the tutorial! This will take you to their landing page, and already you can see how simple it is to navigate. We will explore some of the other pages later, but for now, click on the “Get Started” button to get started.
STEP 1: CHOOSE A SITEGROUND PLAN
The first and most basic plan is the StartUp Plan. As the name suggests, this is what you should start with when you are just starting out.
STARTUP PLAN
The StartUp plan costs only $3.95 a month! That is a steal for starting your own business! This includes,
One Website
10GB Web Space
10,000 Visits Monthly
Plus, all of the essential features.
GROW BIG PLAN
This package costs $5.95 a month, which is still a great deal since you get the basic features plus premium.
This plan will give you even faster customer service response times and priority service which is so helpful when you are starting a new blog. The Grow Big plan includes,
All of the features of the StartUp Plan
Hosting for Multiple Sites
20GB Web Space
Best for up to 25,000 Monthly Visits
Extra Fast Response Times
Premium Support
The Super Cacher – This helps your site run faster, which can improve your SEO ranking with Google and helps keep your readers on your site.
GO GEEK PLAN
Ready to take the blogging world by storm? The biggest SiteGround plan is the GoGeek plan, which costs $11.95 a month. This includes basic features, premium features, and geeky advanced features. In addition to the features of the GrowBig plan you get,
30GB Web Space
100,000 Visits Monthly
This is a great option if you already have a lot of traffic to your blog each month and want to switch from another host or if you anticipate a high amount of traffic to your blog when you launch.
Choose which plan best meets your needs, then click “Get Plan.”

STEP 2: CHOOSE YOUR DOMAIN
A domain name is important since it defines your brand. As a standard rule, domain names should be simple. You can’t make it complicated, or else people won’t be able to find you or remember your domain name.
Bonus tip:
Keep your domain name to 2-3 words. More than that and people are prone to typos.
You can use your own personal name as the title of your blog, or even use a catchy phrase just as long as it is related to your blog and what you are talking about. Just remember to keep everything simple and straight to the point.
Here you can enter your existing domain name or register one upon sign up. Type it in, and the website checks if that domain name is still available. You can also pick your domain extension, such as .com, .org, etc. (however, if possible, I recommend going with .com). Once you have one that’s still free to use, then you’re good to go.
If you have already purchased a domain click on, I already have a domain and enter in your domain name.
Step 3: Review and complete your information

Account Information and Client Information

Payment Information and Purchase Information

Extra services: here, you can choose to select or unselect the extra features that you might need or might not need on your blog. For the most part, the basic features are fine. To remove the extra services, just uncheck the boxes.

Check the box that says you agree to the terms and conditions then click “Pay Now.”

Congratulations!
You can now have hosting for your blog! All you need to do is to install WordPress and get creative. It is pretty simple to set up, but if you are technophobic, guess what?
The tech team at SiteGround will set it up for you!
All you have to do is go here and click on “Live Chat.” One of the ultra-friendly SiteGround representatives will say “hello.” and you just need to ask them to set up your WordPress site and send you your login details.
This process will take a max of fifteen minutes, after which you can access your beautiful new site!
Once they send you your login details, go to www.yournewsite.com/wp-admin and log in.
HOW TO INSTALL WORDPRESS
If you would rather install WordPress on your own, follow the steps below.

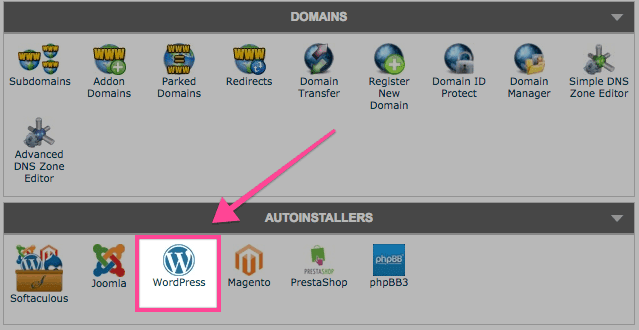
Click on “WordPress” in the Autoinstaller section.
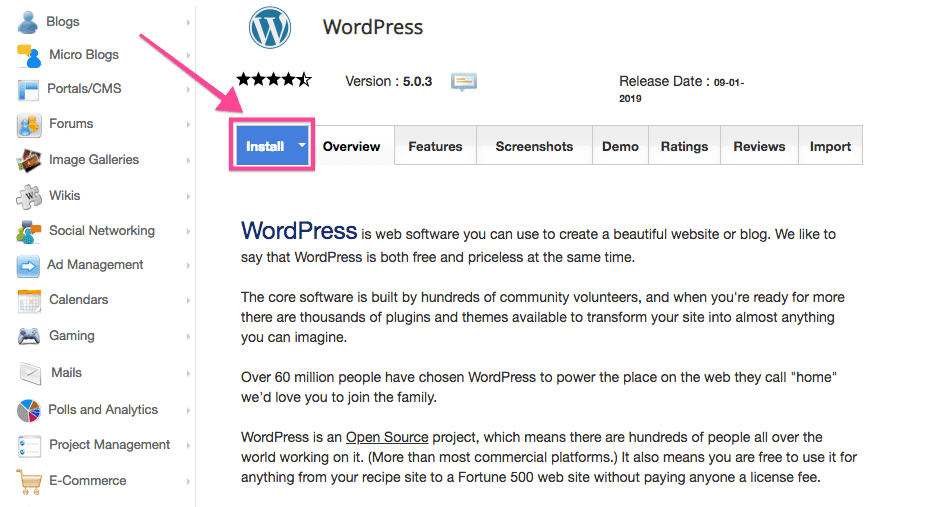
Then click the blue “Install” button.
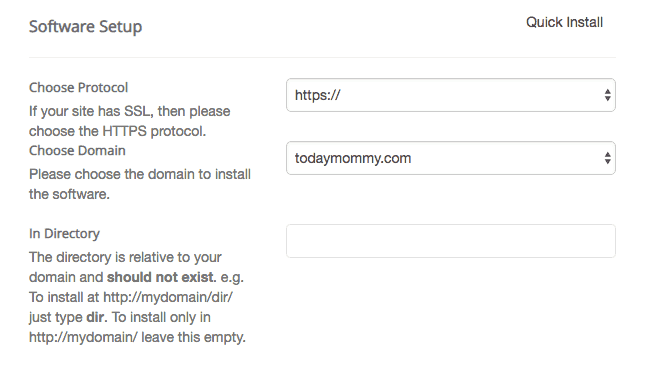
On the next screen, fill out the following:
- Choose Protocol: most likely it is https://
- Choose Domain: The domain for the site you are setting up
- In Directory: Leave this section blank.
- Site Name: Anything to help you remember which site this is. Note: you can update this later.
- Site Description: A brief description of your site. Note: you can update this later.
- Admin Username: You will need to remember this! Write it down and keep it in a safe place.
- Admin Password: You will need to remember this! Write it down and keep it in a safe place.
- Admin Email: Your email address.
- Language: Your preferred language.
- Choose a Theme to Install: You can install a theme here or on the backend of your WordPress site. You can start with a free theme and upgrade to a paid theme as your blog grows! In tomorrow’s lesson I’ll cover my favorite free and paid themes you can use!
Now using the username and password you just created, go to https://www.yournewblog.com/wp-admin (your domain) and log in!

Excellent!
When you are ready, CLICK HERE to go to Step-Three!

